News Archives

View 12 Volt Planet TV

Watch our YouTube "How To" guides here 


Trade Account Application

Find out about our Trade Accounts here 


Crimping Tool Guide

Cable crimping is the cornerstone of your 12 volt electrics, but which tool is best, and why are there so many choices? In this guide, we will show you the different styles of crimping tools, the benefits of each and the best way to crimp your cable. 

Why Crimping Instead of Soldering?

For terminating cables in vehicles, crimping is generally recommended over soldering as it is longer lasting, more convenient and easier to achieve for the DIY-er. 

Solder is not as long-lasting because it is sensitive to vibrations which can, over time, cause it to 'work harden', leading to brittleness and cracking, which will result in a poor electrical connection. Older solder connections will also become weaker as the solder degrades with age, meaning that the likelihood of a poor connection and power loss increases over time. 

Crimping is deemed by many to be much easier, saving time and decreasing the risk of making a poor connection. Soldering takes a lot of practice to get right and a steady hand. With crimping you simply insert the terminal into the tool along with the cable and squeeze, meaning even a beginner can create a professional cable connection. 

Also, if you use crimp terminals that incorporate a shrink sleeve they will offer much better protection against moisture, dirt & debris as these form a seal around the cable to prevent moisture ingress and corrosion. This can be achieved with solder by using separate sleeving, bit it's less convenient.


The Different Types of Crimp Tool

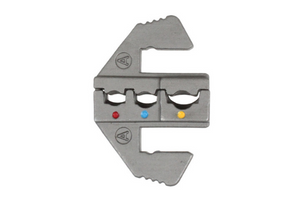
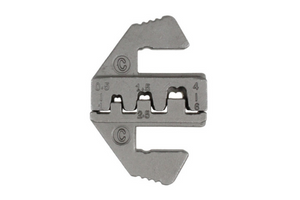
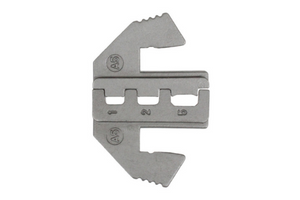
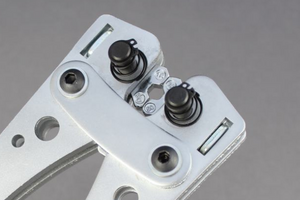
Every crimp terminal style available on the market has its own characteristics and will need a tool that matches. The difference between the tools is usually found in the design of the crimp jaw which needs to form properly around the terminal to create the crimp. Even a subtle change in the jaw design can cause a poor crimp and a corresponding poor connection, so it is vitally important always to use the correct tool for the terminal you intend to crimp. Below we will show you the jaw profiles for some of the most common terminals and explain how they work. 

Image        Type Description
Insulated (or Pre-Insulated) Terminal Crimp Used on very common red, blue or yellow pre-insulated terminals, these jaws will have markings showing which jaw position corresponds to which colour terminal. These work by very tightly squeezing and flattening the copper barrel of the terminal around the conductor and insulation. The compression caused by the permanent deformation of the barrel creates a good mechanical and electrical connection.
Non-Insulated Terminal Crimp
Used on smaller cable terminals without insulation (referred to as non-insulated), these terminals work by curling over 'wings' on the terminal to secure both the copper conductor and plastic insulation in place whilst squeezing from the other side with a flat edge. Depending on the design of the jaw, the crimps for the conductor and insulation may be made simultaneously or one at a time.
Adhesive-Lined Heat Shrink Terminal Crimp

Used on red, blue & yellow pre-insulated terminals that have a pre-fitted heat-shrink sleeve coated with adhesive. This design squeezes the terminal to flatten the copper barrel and create the crimp, whilst the jaws have a flat profile to prevent them piercing the lining (which can let moisture in).

These types of terminal then need heat applied from a heat gun to simultaneously shrink the sleeving and melt the adhesive so that it flows all around the cable. The adhesive then cools and hardens, creating a barrier to moisture and providing excellent strain-relief for the cable. This means that, even with a relatively poor crimp, the cable will not easily pull of of the terminal.

Copper Tube Terminal Crimp

Used for higher current connectors on larger cable sizes, these jaws are strong enough to place a large indent in the copper barrel. This indent squeezes the copper against the inside of the barrel and forms a very strong crimp.

Hexagon crimping tools will indent the terminal from 6 positions around the barrel, producing a very high compression crimp that is extremely strong and has low electrical resistance.


The Right Tool for Your Expected Usage

On our website you may see three different 'duties' of some types of crimping tool:  Light Duty, Standard Duty & Heavy Duty, but which should you choose? Well, it really depends on how often you'll be using the tool as they have different features. The table below summaries the differences which should allow you to choose the most appropriate one for your needs.

Tool

Description
Light Duty These tools are designed for use when crimping a small number of connections. Simple, but with limited handle protection, these can get the job done but would be uncomfortable if making a lot of connections.  Crimp pressure is usually controlled by how much you squeeze the handles so it can vary crimp-to-crimp and you should practice to get good consistency.
Standard Duty These tools are the most common for DIY'ers, offering good handle protection so they are comfortable when crimping multiple connections during a project. The build quality also tends to be higher than light-duty tools offering a longer life span. Importantly, crimp pressure might be controlled by an adjustable ratchet mechanism which means crimp pressure is consistent and repeatable.
Heavy Duty These are professional grade crimping tools that offer superior comfort with large handles & a build quality that offers a longer lifespan. Designed with converters, mechanics or other professionals in mind, these tools are great for doing a large number of highly repeatable crimps, day in, day out. 


How to Crimp a Terminal

Crimping a terminal is pretty straight forward and takes just 3 steps. 

  1.  Strip your cable and insert into the terminal.
  2. Place terminal into the appropriate tool & jaw position
  3. Squeeze and release
  4. Repeat steps 2 & 3 if you are crimping the conductor and insulation separately.

And there you have it. Of course, there are a few other helpful tips and tricks you can use to make this process easier and you can see these in the video below. Our best advice is to practice, practice, practice!


We hope you have found this article helpful however if you need any further help please do not hesitate to contact our helpful support team. 

Disclaimer - The information contained in these articles is provided in good faith and we do our best to ensure that it is accurate and up to date, however, we cannot be held responsible for any damage or loss arising from the use or mis-use of this information or from any errors or omissions. The installer is ultimately responsible for the safety of the system so if you are in any doubt, please consult a qualified electrician.

Business Hours: Mon - Fri | 9am - 5pm
CALL Sales & Support: 01844 885100
Email: sales@12voltplanet.co.uk
12 Volt Planet

12 Volt Planet

Auto & Marine Electrical Components